

Kratom Soap Recipes
Cold Pressed Kratom Soap
In this recipe we are using the metric system and a scale. When making cold pressed soap, you will need to use accurate measurements to yield the best results. Making cold pressed soap is a bit more complicated than hand-milled or the “melt and pour” varieties, but if you have a little bit of time and patience, it can also be more rewarding. Natural cold pressed soaps are soft and have a creamy lather. The best thing about this soap is the natural ingredients, free of any unwanted additives.

Warning: One of the ingredients for this soap making process is Sodium Hydroxide or Lye, a strong alkaline and caustic substance. It is important to follow directions closely. You will be mixing lye with water during the first stage of the process. You must always add the lye to the water, never add water to lye. Have a bottle of vinegar or lemon juice on hand to neutralize the lye if you get it on your skin. Quickly splash skin with the vinegar or lemon. After neutralizing the lye, rinse the area thoroughly with plenty of running water. Call your local Poison Control Center, or for serious burns, seek medical treatment immediately.


Things You Will Need:
A decent gram or high quality kitchen scale. Ounce scales can be used but, in my opinion, can be less accurate. If you have an ounce scale, you can convert the grams to ounces using this formula: oz = g ÷ 28.35
A work space. A clutter free table or counter in a room with plenty of ventilation. Lye will create fumes that can burn eyes and should not be inhaled. Working at a table outside would be even better, but you will need access to a stove for part of the process. Cover your table or counter with old news papers to protect it from spills. Lye will damage the surface if spilled.
Rubber gloves. Rubber gloves must be worn anytime you are handling the ingredients or the soap until the final stage.
Goggles. You will wear goggles for the first stage of the process to protect your eyes.
Protective clothing and an apron. It’s a good idea to where an old long sleeve shirt and long pants to protect your skin from possible spills or splashes. I recommend an apron as well. Be sure that your protective clothing is well fitted and does not hang or drag. This is to prevent spills.
Two candy thermometers. These are to make sure your lye and water mixture, and your oils are at the same temperatures before mixing. The long variety that can clip/hang to the side of the container or pot works the best.
A stainless steel cooking pot. The 8 quart variety is a good size. You can use an enamel coated pot, but aluminum pots will not work as they react with the lye.
A large heat proof stirring spoon. I recommend a slotted plastic or stainless steel spoon. Do not use an aluminum spoon because it reacts with the lye.
A large bowl or large measuring cup. This is to measure out your oils and should comfortably fit 500g. Should be glass or plastic.
A large glass measuring bowl/cup. This is for measuring your water and mixing your lye and water mixture. This should be at least a 16 ounce glass or high heat plastic bowl. A Pyrex style 16 ounce measuring cup works well because of the lip on the side to make pouring liquids easier and more safe.
A measuring cup. This is to measure out your lye granules and should be big enough to comfortably fit 120g. A 12 ounce glass or plastic measuring cup works well.
Two old towels. These are to insulate your soap in the second stage of the process.
Soap molds. Purchase soap molds from a craft or specialty soap store, or get creative and make your own. You can use old food containers, plastic cups, even glass containers. Look for a shape or shapes that you find interesting and go with it. Just remember that the mouth of the container must be bigger than the bottom so that you can take the soap out of the mold easily. You can also use a larger square or rectangle shape to slice it into bars. Be creative when deciding on molds.
A small measuring spoon. This is to measure out essential oils to add fragrance to your soap. I use a gram spoon that holds roughly 1 mL of essential oils.
Ingredients:
500 grams of Olive Oil. I like to use organic extra virgin olive oil.
300 grams of Coconut Oil. I like to use organic extra virgin coconut oil.
300 grams of water. This should be filtered or distilled.
117.5 grams of lye(sodium hydroxide) granules. You can find this at home improvement stores, but ensure purity, I suggest purchasing this from a specialty soap making store.
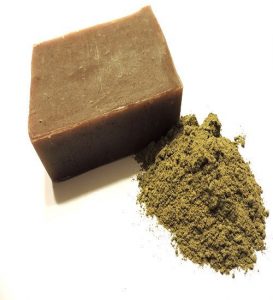
Roughly 50 grams of powdered kratom(mitragyna speciosa). Unlike the other ingredients, the weight of your kratom powder does not have to be exact. Your kratom powder should be fresh, clean, and potent for best results. Vibrant greens add a lovely color to the soap and contains more chlorophyll, which is said to have detoxifying benefits.
Essential oils. These are for adding fragrance to your soap and can offer benefits of aromatherapy. You can often find essential oils at natural food stores, craft stores, or specialty soap stores. I sometimes like to use natural plant based fragrance oils, but I always suggest staying away from synthetic fragrances.
Directions:
Begin by gathering all your supplies and ingredients. Have your 50 grams of kratom power ready and your essential oils close by.
Put on your protective clothing, goggles, gloves, and if desired, your apron.
Measure out your coconut and olive oil using your large glass or plastic bowl and your scale. Remember to account for the weight of the bowl. To do this, place the empty bowl on your scale and press “tare” (or sometimes “calibrate”) button to make the weight of the bowl show as 0. If you do not have a “tare” button, just place the bowl on the scale and adjust your scale to 0. Measure out 5oo grams of olive oil and 300 grams of coconut oil and pour the oils into your big cooking pot. Place the pot of oils on the stove, but leave the stove off for now.
To mix the lye and water, you need to be in a well ventilated area, or do this part outside. Measure out your 300 grams of filtered or distilled water in the large 16 ounce bowl. Remember again to tare the scale, to account for the weight of the new, larger bowl. Next, and very carefully, weigh out your lye granules, again take account of the measuring cup. Next, slowly and carefully pour the granules into the bowl of water. Use your spoon to slowly stir and dissolve the granules in the water. Continue to stir until the granules are completely dissolved. The mixture will become very hot. Be very careful to avoid breathing any fumes and avoid any spills.
At this time, you will turn on your stove and gently warm up your oils. Add the thermometer to your warming oils. Also, now is the time to add the other thermometer to the lye/water mixture. The lye should be cooling down slowly while your oils slowly rise in temperature. The goal here is to coordinate both the two temps. The lye/water should cool to around 110°F, and the oils should heat up to around 110°F. You can raise the oil temperature to about 115°F as it will cool slightly when you remove it from the heat. Then use pot holders to take your pot of oils outside (or to a ventilated area) and allow them to cool to about 110°F. The two temps, for both the oils and the lye mixtures, do not have to match exactly, but should not be more than 5 degrees apart and neither temp should fall below 99°F. When the two temperatures are matching, slowly pour the lye mixture into the pot of oils in a slow, steady stream, while stirring the oils. Be very careful to avoid any spills.
Now is the hard part, patience is required. Continuously stir the mixture. You want to stir fairly vigorously, but not so much that you are creating splashes or bubbles in the mixture. The goal here is to stir until saponification happens. This may take 15 minutes, or it may take an hour, sometimes longer. Just keep stirring and stirring. You will know when your soap mixture is ready when you see “tracing”. This is when you run your spoon through the mixture and it leaves a trace lasting a few seconds. The mixture at this point should be like a thick soup. When your mixture is in the tracing stage add in your 50 grams of kratom powder and use your measuring spoon to measure out 10 mL or more of your choice of essential oils and add them to the soap mixture.
At this point, still wearing your gloves, pour the mixture into your molds. Place your filled molds in a place where they will not be disturbed for roughly 48 hours. Cover your filled molds with your old towels to insulate them and slow the cooling process. This cooling stage is stage two of the soap making process.
In 48 hours, your soap will have sufficiently cooled and will be solid, but it will still be quite soft. It is time for the third stage of the process, the curing stage. Take your soaps out of the molds. If you are cutting bars, now is the time to cut them, but you still need to wear gloves at this point because this soap not yet finished and can still possibly cause burns to the skin. Store your soaps in a cool, dry place for 5 weeks. This is really your patience is required. Every couple weeks you check on your soap and with a damp cloth, wipe away any soda ash that develops on your soap. This is a harmless white ashy substance that can develop during the curing process and does not effect the final product.
After the 5 week curing stage, your kratom soap should be ready to use. Time to enjoy your kratom soap!
For a complete listing of our Kratom product visit our site.